Who is this post good for?
For someone that is already familiar with the use of GitHub, but would like to collaborate on projects that use Gerrit to integrate changes. More specifically, someone interested in contributing to DCI projects. If you're not familiar yet with what DCI is please take a look at this post Introduction to the Red Hat Distributed CI
Gerrit
What is Gerrit?
Gerrit is a collaboration tool integrated with Git (not GitHub). It is used to ease the process of reviewing and integrating changes in a Git repository via a web browser. For someone familiar with GitHub, it could be considered as a tool that provides something quite similar to GitHub, i.e. a site where collaborating and reviewing/integrating changes are easy and sometimes fun!
Why Gerrit?
There are many reasons why one would choose to use Gerrit. The most important is that Gerrit is Open Source.
Gerrit is plugable and extensible, which means there are many plugins out there that could be used to enhance its use, not only that, anyone could write their own, if needed.
Gerrit workflow makes you do one commit at a time. This invites to keep changes small and concise. Making them easy to: review, test, and to revert if needed. Below we will explain this particularity of Gerrit.
Finally, another reason is to self-host the service and not with a 3rd party. I know! This requires extra effort to maintain it, but some people are OK with it, sometimes it is a requirement to self-host.
Whether or not all the trade-offs are worth, the reality is that Gerrit is an amazing option used by many important Open Source projects like, android/reviews, chromium (The Open Source project the Chrome Browser is based of)/reviews, go (golang)/reviews, and of course Gerrit itself among many others.
A common collaboration flow in GitHub
Let's now go through a very generic example of a common collaboration flow in GitHub, not to be confused with a workflow like git-flow or GitHub flow. As a recommendation, please refer to any collaboration documentation on the project or repository before contributing as each project may follow a particular workflow.
A common flow goes like this:
- Find an awesome GitHub repo (github.com/awesome/repo) you would like to contribute
- Read the collaboration notes to adjust the steps as required, this could include, creating an issue first, running tests prior to submitting a pull request, lint your code, etc.
- "Fork" the repo to your account (github.com/collaborator/repo)
- Clone your forked repo locally (
git clone ...) - Create a branch (
git checkout -b my_fix ...), this is optional but is highly encouraged - Make your changes, either in one commit or multiple commits (
git commit ...) - Push your changes in your branch
my_fixto your repo (git push origin my_fix) - Open a pull-request (PR) in the awesome GitHub repo you forked, you go to the github.com/awesome/repo/...
- Wait patiently for feedback, sometimes this takes some back and forth to get your changes in a desired state
- Create more commits based on the feedback, sometimes you rebase, or squash commits and keep pushing them to your branch in your repo
- Get approval and your changes are merged in the repository
- Profit!
You got the idea :), now, let's say the awesome repo is not hosted in GitHub :-o, don't panic! Let's say that awesome repo is using Gerrit for collaboration, where do I start? glad you ask, next, we will take a look at a guided example of how the flow described above will apply in Gerrit.
Requirements
Software
Let's get ready now and make sure you have the tools needed to work with Gerrit:
1 not really a requirement but let's be honest, this plugin makes so easy the interaction with Gerrit
Settings
- Make sure to add your ssh public key to your GitHub account
For this example we will need to create an account in the Gerrit instance we will be working on. This is no different from GitHub.
Luckily, the instance we will be using in the example can use our GitHub account for it, here are the instructions to link our GitHub account:
- Go to Software Factory click "Login" on the top-right corner
- Next, click "Log in with Github"

- The very first time we do this and once we're logged in to our GitHub account, it will request authorization from Software Factory to use our GitHub account, this provides read-only access to our public ssh-keys and our email-address
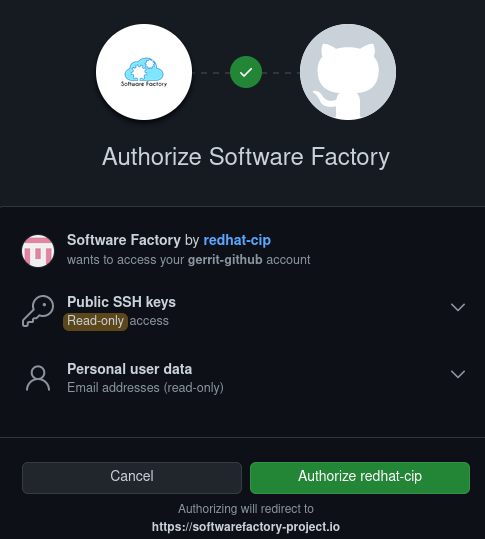
- Once authorized we will be logged in to Software Factory
- Next time you go to Software Factory you only will need to click "Log in with Github"
Note: You may see a blank page with the word "Forbidden", if that's the case please contact us and we will get that fixed for you.
Configuration
In our ~/.gitconfig we need to add the following setting:
[gitreview]
    username = our-github-username
A guided example
Now, let's say the awesome repo we would like to contribute is using Gerrit. As we mentioned for this example, let's say that awesome project is dci-openshift-app-agent which is hosted in Software Factory, the site we logged in with our GitHub credentials.
Gerrit flow
First, we will look at a high-level workflow, similar to what we saw with GitHub. Later, we will go into the details, explaining the differences in the section below.
- Find the awesome Gerrit repo you would like to contribute
- Read the collaboration notes to adjust the steps as required, this could include, creating an issue first, running tests prior to submitting a pull request, lint your code, etc.
- Clone the repo locally, copying the hooks (
git clone ... && scp ...) - Create a branch (
git checkout -b my_fix ...), this is optional but is highly encouraged - Make your changes, in one single commit (
git commit ...) - Use git-review to push your changes and create the change request (
git review) - Wait patiently for feedback, sometimes this takes some back and forth to get your changes in a desired state
- Modify your commit based on the feedback, sometimes you rebase, at the end, you amend the commit (
git commit --amend) and push (git review) - Get approval and your changes are merged in the repository
- Profit!
Gerrit flow (explained)
Now that we have a high-level view of the workflow, let's get into the details using an example.
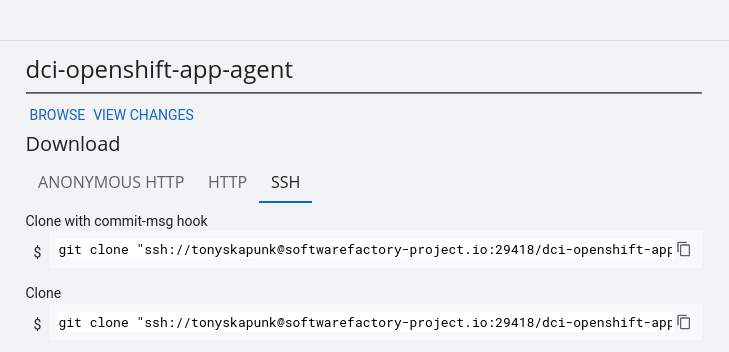
- This is the project we will use to clone: dci-openshift-app-agent
- In the link above we will find two ways to clone the repo, let's pick the first one "Clone with commit-msg hook"
Let's pause for a second and explain what's going on.
The first difference with the GitHub flow is that we didn't "fork" then clone locally. We will clone locally directly.
Let's now explain what's going on with the command that we will execute:
git clone "ssh://our-github-username@softwarefactory-project.io:29418/dci-openshift-app-agent" &&
scp -p -P 29418 our-github-username@softwarefactory-project.io:hooks/commit-msg "dci-openshift-app-agent/.git/hooks/"
The first command is a regular git clone to the dci-openshift-app-agent repo that is hosted in softwarefactory-project.io using our-github-username via ssh on port 29418.
The second command is copying from the same host and port as the first command, a file called commit-msg into the locally repo just cloned in the hooks directory.
This hook commit-msg will help to create a random Change-Id for each commit, at the moment we will not go into the details of the Change-Id but is enough to say that this is the way to keep track of changes in Gerrit. We will get back to this Change-Id later on.
Let's get back to the flow
- Creating a branch is optional, but since you're probably used to this let's keep that (
git checkout -b my_fix ...) - Make your changes and create one single commit (
git commit ...)
Again, let's stop here to explain what's going on.
Remember the Change-Id? The hook commit-msg will generate it after writing the commit message. If you have created a commit and look at the message, you will find there's a Change-Id. As an example, let's take a look at the most recent commit in that project at the time of this writing. The commit is: baa3f42
$ git show baa3f42 --summary
commit baa3f423ad1fb8c6daa9368f834166a5f3a4dd93
Author: Tony Garcia <tonyg@redhat.com>
Date:   Wed Mar 16 09:15:57 2022 -0500

    Fix pullsecrets usage in preflight role

    Change-Id: I2f72c5fab255490132c348c73f2214e473833d5d
The Change-Id is important because this is the way Gerrit tracks changes. When a commit is pushed to the project repository, Gerrit identifies a new Change-Id, and a Change Request (CR) is created. This is another difference with GitHub, instead of requesting the project to pull a branch with one or more commits (PR), a change request is created with the new commit.
This means that if you create more than one commit the commit-msg will generate one Change-Id per commit and when we push them to the repository, Gerrit will create one CR per each of them. Let's stop here for now, we will learn how to make changes to a CR.
- Use git-review to push your changes and create the change request (
git review)
Here we are making use of the git plugin we installed git-review, the plugin will take care of pushing the commit to Gerrit using the right incantation, we'll not go into the internals of this but if you're curious you could look at this Gerrit documentation with a walkthrough that does not use git-review.
Once the commit is pushed the output will include a URL to the CR, that's it, the CR has been already created, no need to go and formalize the request. Here is the CR for the example of the Change-Id in the previous steps.
Moving along...
- Wait patiently for feedback, sometimes this takes some back and forth to get your changes in the desired state
- Modify your commit based on the feedback, sometimes you rebase, add changes, at the end you amend the commit (
git commit --amend) and push (git review)
This is another part that is quite different from GitHub, instead of creating additional commits to your branch, you amend the commit. Personally, this was a bit strange from a GitHub experience. Amending commits feels like doing git push --force on every modification to the CR, but this is where Gerrit is doing things differently.
Gerrit relies on refs in simple terms, Gerrit recognizes the differences between the initial commit and the amended one, this creates a patch set. A patch set correlates to a commit. So the CR ends with a collection of patchsets. The last patch set is relevant as if the CR is approved this is what is going to be merged.
In GitHub, this is equivalent to having a PR with multiple commits and squashing all the commits into a single one before merging.
- Get approval and your changes are merged in the repository
- Profit!
Gerrit vs GitHub workflow
Now that we have reviewed both workflows, let's put them side to side:
| Gerrit | GitHub |
|---|---|
| Find an awesome Gerrit repo you would like to contribute | Find an awesome GitHub repo you would like to contribute |
| Read the collaboration notes, etc. | Read the collaboration notes, etc. |
| Clone the repo locally, copying the hooks | "Fork" the repo to your account |
| You clone your forked repo locally | |
| Create a branch | Create a branch |
| Make your changes, in one single commit | Make your changes, either in one commit or multiple commits |
| Use git-review to push your changes and create the change request | Push your changes in your branch to your repo |
| Open a pull-request (PR) in the awesome GitHub repo you forked | |
| Wait patiently for feedback... | Wait patiently for feedback... |
| Modify your commit based on the feedback, sometimes you rebase, at the end, you amend the single commit and push | Create more commits based on the feedback, sometimes you rebase, or squash commits and keep pushing them to your branch in your repo |
| Get approval and your changes are merged in the repository | Get approval and your changes are merged in the repository |
| Profit! | Profit! |
Summary
We learned that using Gerrit to integrate changes is not that different from GitHub, in the end those are just tools or services that give a structure to how those changes are reviewed, validated, tested, and merged. We also learned that Gerrit uses one commit per change, something that makes it easy to review, test and revert if needed.
It is important to highlight that this post is not about what tool or service is better, it is about not being afraid to collaborate using different tools or services. Sometimes it is frustrating having to deal with things done differently but in the end it is all about options. In my opinion, it is better to deal with those differences than do not having an option.
I hope this post helps to make your life easier and motivates you to contribute to the next awesome project you find. Either If that project happens to be under Gerrit or something else.
