Here is the schema of the OpenShift cluster we are going to create on a baremetal server. We will do that by using Red Hat Distributed CI (DCI). DCI is a great CI tool written in Ansible that can help you install OpenShift on baremetal, automate the deployment of your plugins and workloads, and run various tests.
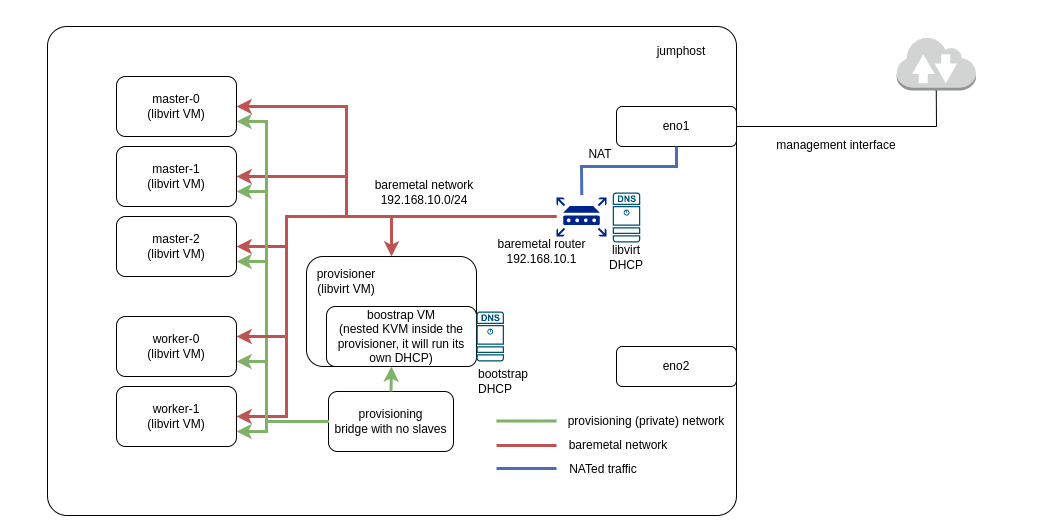 Fig. 1. Virtual machines and networks.
Cluster Overview
Hardware Resources and VMs
First, estimate whether you have enough resources for the desired cluster. As a bare minimum, you will need resources for the jumphost, provisionhost, and three masters. Then, depending on the workload, reserve some vCPU, RAM and space for the workers. For example, the following resource distribution could work for an Intel 96 vCPU (Intel(R) Xeon(R) Gold 6248R CPU @ 3.00GHz), 144GB total RAM, and 500GB disk space:
| Machine                 | RAM          | vCPU         | disk space |
| ----------------------- | ------------ | ------------ | ---------- |
| jumphost RHEL 8.7       | 16G RAM      | 4 vCPU       | 50G        |
|                         |              |              |            |
| cluster provisionhost   | 16G RAM      | 8 vCPU       | 50G        |
| cluster master0         | 16G RAM      | 8 vCPU       | 50G        |
| cluster master1         | 16G RAM      | 8 vCPU       | 50G        |
| cluster master2         | 16G RAM      | 8 vCPU       | 50G        |
| cluster worker0         | 32G RAM      | 30 vCPU      | 100G       |
| cluster worker1         | 32G RAM      | 30 vCPU      | 100G       |
|                         |              |              |            |
| cluster in total        | 144G RAM     | 96 vCPU      | 450G       |
Networks
During the cluster creation, DCI will create all of these virtual machines as well as two networks (see Fig. 1):
-
The
provisioningnetwork is an internal network used to bootstrap the VMs. -
The
baremetalnetwork connects all the OCP nodes and automatically creates a virtual router to perform NAT for external connections. This allows the OCP nodes to reach the internet, but does not allow connections from the internet. Thebaremetalnetwork also deploys a virtual dnsmasq instance to provide basic DHCP and DNS configuration. Each VM will receive an available IP address from the DHCP pool managed by this dnsmasq instance.
Software Prerequisites
RHEL on Jumphost
Let's start from installing RHEL 8.7 on your jumphost machine. Note that we require RHEL and not Ubuntu in order to have all the dependencies needed to automatically create VMs and networks. If you don't have all the entitlements yet, you can use the Red Hat Product Trial Center to try RHEL and OCP for free. To get started, make sure to activate your RHEL subscription to enable the installation of all required packages.
Enable Nested KVM
Check Fig.1 and you'll notice that the provisionhost machine contains a nested boostrap VM. To enable the possibility of its creation, enable nested KVM on the jumphost.
DCI packages
Next, you'll need to install the DCI packages. During the next steps, you'll use DCI twice: first, to automatically create the libvirt cluster and required networks, and then to easily install OCP on that cluster.
First, install the DCI repository:
    $ sudo dnf -y install https://packages.distributed-ci.io/dci-release.el8.noarch.rpm
    $ dnf repolist | grep dci
Then install the dci-ansible package, to pin the Ansible version to 2.9:
    $ sudo subscription-manager repos --enable ansible-2.9-for-rhel-8-x86_64-rpms
    $ sudo dnf install dci-ansible
    $ ansible --version | grep core
Next, install the EPEL repositories, which are required by dci-openshift-agent:
    $ sudo dnf install https://dl.fedoraproject.org/pub/epel/epel-release-latest-8.noarch.rpm
    $ sudo dnf config-manager --set-enabled epel
    $ sudo dnf config-manager --set-enabled epel-modular
Finally, install and verify the agent:
    $ sudo dnf install dci-openshift-agent
    $ dci-openshift-agent-ctl -h
SSH Keys
Copy your public SSH key to /etc/dci-openshift-agent/id_rsa.pub to enable git clone for the DCI tool.
Then, copy your private and public keys to ~/.ssh and ensure that they have the proper permissions.
    $ chmod 600 ~/.ssh/id_rsa
    $ chmod 600 ~/.ssh/id_rsa.pub
Create Virtual Cluster
YAML Configuration
Let's follow the example configuration we discussed above and describe it in the form of a YAML config to feed DCI during the creation of the virtual cluster.
Log in as dci-openshift-agent (this user was created during the installation of DCI packages) and create a folder with the cluster configuration in its home /var/lib/dci-openshift-agent.
    $ sudo su - dci-openshift-agent
    $ mkdir cluster && cd cluster
Create two files in this directory. The first one, hosts, is a basic Ansible inventory.
    $ cat cluster/hosts
    [vm_host]
    localhost ansible_connection=local prov_nic=eth0 pub_nic=eth1
The second one, cluster-libvirt-resources.yml, is a YAML description of Fig. 1 for DCI.
    $ cat cluster/cluster-libvirt-resources.yml
    all:
      vars:
        prov_nic: eth0
        pub_nic: eth1
        provisionhost_user: dci
        cluster: cluster
        domain: johnsmith.lab
        masters_prov_nic: ens3
        cluster_domain: "{{ cluster }}.{{ domain }}"
        baremetal_net_ipv6: false
        redfish_inspection: false
        image_url: https://cloud.centos.org/centos/8-stream/x86_64/images/CentOS-Stream-GenericCloud-8-20210603.0.x86_64.qcow2
        enable_conserver: true
        # use local dnsmasq provided by libvirt
        apps_ip_address: 192.168.10.10
        api_ip_address: 192.168.10.5
        dns_vip_address: 192.168.10.6
        # save VM storage in a different place than /var/lib/libvirt/images (root space)
        libvirt_image_path: /home
        networks:
          - name: baremetal
            ip: 192.168.10.1
            dhcp_start: 192.168.10.100
            dhcp_end: 192.168.10.150
            domain: "{{ cluster_domain }}"
            bridge: baremetal
            forward_mode: nat
            dns:
            forwarders:
              - domain: "apps.{{ cluster_domain }}"
                addr: 127.0.0.1
            hosts:
              - ip: 192.168.10.5
                hostnames:
                  - api
          - name: provisioning
            bridge: provisioning
        hosts:
          - name: provisionhost
            domain: "{{ cluster_domain }}"
            users:
              - name: "{{ provisionhost_user }}"
                gecos: Admin User
                groups: wheel
                sudo: ALL=(ALL) NOPASSWD:ALL
                lock_passwd: false
            run_commands:
              - "sudo -u {{ provisionhost_user }} ssh-keygen -t rsa -b 4096 -f ~{{ provisionhost_user }}/.ssh/id_rsa -N ''"
              - dnf install epel-release -y
            driver: kvm
            memory: 16384
            vcpus: 8
            arch: x86_64
            boot_dev: hd
            cpu_mode: host-passthrough
            image_src: "{{ image_url }}"
            disk_size: 50G
            disk_cache: unsafe
            disk_bus: virtio_scsi
            networks:
              - name: provisioning
              - name: baremetal
                mac: "52:54:00:00:02:00"
          - name: dciokd-master-0
            domain: "{{ cluster_domain }}"
            users: []
            run_commands: []
            driver: kvm
            memory: 16384
            vcpus: 8
            arch: x86_64
            boot_dev: hd
            cpu_mode: host-passthrough
            image_src: "{{ image_url }}"
            disk_size: 50G
            disk_cache: unsafe
            disk_bus: virtio_scsi
            networks:
              - name: provisioning
              - name: baremetal
                mac: "52:54:00:00:02:01"
          - name: dciokd-master-1
            domain: "{{ cluster_domain }}"
            users: []
            run_commands: []
            driver: kvm
            memory: 16384
            vcpus: 8
            arch: x86_64
            boot_dev: hd
            cpu_mode: host-passthrough
            image_src: "{{ image_url }}"
            disk_size: 50G
            disk_cache: unsafe
            disk_bus: virtio_scsi
            networks:
              - name: provisioning
              - name: baremetal
                mac: "52:54:00:00:02:02"
          - name: dciokd-master-2
            domain: "{{ cluster_domain }}"
            users: []
            run_commands: []
            driver: kvm
            memory: 16384
            vcpus: 8
            arch: x86_64
            boot_dev: hd
            cpu_mode: host-passthrough
            image_src: "{{ image_url }}"
            disk_size: 50G
            disk_cache: unsafe
            disk_bus: virtio_scsi
            networks:
              - name: provisioning
              - name: baremetal
                mac: "52:54:00:00:02:03"
          - name: dciokd-worker-0
            domain: "{{ cluster_domain }}"
            users: []
            run_commands: []
            driver: kvm
            memory: 32768
            vcpus: 30
            arch: x86_64
            boot_dev: hd
            cpu_mode: host-passthrough
            image_src: "{{ image_url }}"
            disk_size: 100G
            disk_cache: unsafe
            disk_bus: virtio_scsi
            networks:
              - name: provisioning
              - name: baremetal
                mac: "52:54:00:00:02:04"
          - name: dciokd-worker-1
            domain: "{{ cluster_domain }}"
            users: []
            run_commands: []
            driver: kvm
            memory: 32768
            vcpus: 30
            arch: x86_64
            boot_dev: hd
            cpu_mode: host-passthrough
            image_src: "{{ image_url }}"
            disk_size: 100G
            disk_cache: unsafe
            disk_bus: virtio_scsi
            networks:
              - name: provisioning
              - name: baremetal
                mac: "52:54:00:00:02:05"
VMs and Networks
We now have everything we need to run the creation of the virtual cluster. To do so, execute the following commands:
    $ sudo su - dci-openshift-agent
    $ cd /var/lib/dci-openshift-agent/samples/ocp_on_libvirt/
    $ ansible-playbook -v libvirt_up.yml -i /var/lib/dci-openshift-agent/cluster
This playbook will:
- Create 1 virtual machine to be used as a provisioning node.
- Create 5 virtual machines to be used later for the OCP installation: 3 masters and 2 workers.
- Create 2 virtual networks:
provisioningandbaremetal. - Generate the relative hosts file to be used later as an inventory for the OCP installation.
Once the execution is complete, you can list the created virtual machines with the following command:
$ sudo virsh list --all
You should see the following output:
    Id   Name            State
    --------------------------------
    87   provisionhost   running
    -    dciokd-master-0 shut off
    -    dciokd-master-1 shut off
    -    dciokd-master-2 shut off
    -    dciokd-worker-0 shut off
    -    dciokd-worker-1 shut off
You can also list the virtual networks with the following command:
$ sudo virsh net-list --all
You should see the following output:
    Name            State   Autostart   Persistent
    ------------------------------------------------
    baremetal       active  yes         yes
    default         active  yes         yes
    provisioning    active  yes         yes
If you need to remove the libvirt resources, use the following commands:
    $ cd /var/lib/dci-openshift-agent/samples/ocp_on_libvirt/
    $ ansible-playbook -v libvirt_destroy.yml -i /var/lib/dci-openshift-agent/cluster
Install OpenShift
The last step is to use the created virtual cluster to install OpenShift.
Configure DCI
To configure DCI, follow these steps:
-
Login as the
dci-openshift-agentuser (note, that DCI installation configured its home to be at/var/lib/dci-openshift-agent):$ sudo su - dci-openshift-agent -
Create a new folder to store the configuration for the OpenShift cluster:
$ cd $HOME && mkdir dci-config -
Tell DCI the location of this folder by setting the path in the file
/etc/dci-openshift-agent/config:$ cat /etc/dci-openshift-agent/config CONFIG_DIR=/var/lib/dci-openshift-agent/dci-config -
During the creation of the VMs and networks, DCI
ocp_on_libvirtalready generated the hosts file describing your cluster resources. Copy that file into the configuration folder:$ cd /var/lib/dci-openshift-agent/samples/ocp_on_libvirt $ cp hosts /var/lib/dci-openshift-agent/dci-config/hosts -
To unlock an automated OpenShift installation, copy the pull-secret file you got with your OpenShift subscription into
/var/lib/dci-openshift-agent/dci-config/pull-secret.txt. -
To set an OpenShift version to install, add
settings.ymlfile in the DCI configuration folder$ cat $HOME/dci-config/settings.yml --- dci_name: johnsmith-ocp-install dci_agent: openshift dci_topic: OCP-4.11 cluster: "cluster" dci_tags: ["debug"] # vms do not support redfish redfish_inspection: false -
To get the job displayed in the DCI UI, create remote-ci credentials, and copy them into the file
dcirc.sh, then source it:$ source /var/lib/dci-openshift-agent/dci-config/dcirc.sh
Install OpenShift
Now everything is ready to start the OCP installation. To begin, navigate to the directory containing the DCI OpenShift configuration:
$ cd /var/lib/dci-openshift-agent/dci-config
Then run the command to start the OCP installation:
$ dci-openshift-agent-ctl -s -- -v
To follow the installation progress, you can tail the log file on the provisionhost VM. The keys are already exchanged, so you can directly ssh:
    $ ssh dci@provisionhost
    $ tail -f /home/dci/clusterconfigs/.openshift_install.log
Once the cluster is installed, you will find all the resources required to interact with the cluster in $HOME/clusterconfigs: both oc and kubectl binaries, as well as kubeconfig file.
To connect to the cluster nodes, you can pass by the provisionhost, for example, here is how to access the master-0 node:
    $ ssh dci@provisionhost
    $ ssh core@dciokd-master-0
Don't forget to push the contents of $HOME/cluster and $HOME/dci-config to a private Git repository so you can easily reuse it if needed.
Redeploy OpenShift or Destroy the Cluster
We hope this automated installation was smooth and easy.
To redeploy or use another version of OpenShift, there is no need to destroy the VMs. Simply repeat the Install OpenShift step.
If you need to remove the libvirt resources, VMs and networks, use the following commands:
    $ cd /var/lib/dci-openshift-agent/samples/ocp_on_libvirt/
    $ ansible-playbook -v libvirt_destroy.yml -i /var/lib/dci-openshift-agent/cluster
